Circuit Negma

C++, C, VB.NET, PCB, Electronics, Circuit Design

Posts Tagged ‘PADS’

PADS Layout :: How to extract an IPC-356 netlist from PADS

Posted by Circuit Negma on September 21, 2009


Created By: Hussein Nosair

Solution

PADS 9.0 and newer:
Beginning with PADS 9.0 there is native IPC netlist extract capability.  Go to File > Export and change the "Files of Type" from ASCII Files (*.asc) to IPC 356 Files (*.ipc).  After clicking save you will be able to choose between IPC-D-356 or IPC-D-356A netlist output.
PADS2007.4 and older:

The older versions of PADS do not have native IPC netlist extraction.  However, you can download a VB script that has been written by a 3rd party vendor at CapeCAD.com (note, the VB script has not been tested by Mentor Graphics and we assume no responsibility for it’s accuracy).

Posted in PCB | Tagged: , , , | Leave a Comment »

PADS Logic&Layout :: How to Back Annotate changes from PADS Layout into PADS Logic

Posted by Circuit Negma on September 21, 2009


Created By: Hussein Nosair 

Solution

Method1:1) Open your schematic in PADS Logic
2) Go tools > select PADS Layout > You will get ‘Connect to PADS Layout’ popup menu > click on Open > Navigate to modified PCB Design file > click Open.
3) The selected PCB design file will open in another PADS Layout window (keep it open).
4) Select PADS Logic window
5) Within the ‘PADS Layout link’ popup menu > click on the Design tab > click on ‘ECO from PCB’

This will update the changes of PADS Layout into PADS Logic

Method2:1) Open your PCB design file in PADS Layout
2) Go tools > Compare/ECO > you will get Compare/ECO Tools popup window
3) Click on the Documents tab > Add a check mark next to "Original Design to Compare and Update" and navigate schematic netlist file.
4) Then from "New Design with Changes" , click "Use Current PCB Design".
5) From the ‘Output Options’ add a check mark next to "Generate Difference Report" and "Generate ECO File"
6) Note down the location of ECO file then is going to be generated and click on the button ‘RUN’
7) Open PADS Logic
8) Invoke Schematic file.
9) Go to File > Import > will get ‘File Import’ popup menu
10) Within the popup menu select ‘Files of Type’ as ECO Files (*.eco) and navigate the .eco file which is generated from the PADS Layout > Click open.

This imports the changes of PADS Layout into PADS Logic.

Note for back annotation of renumbered Reference Designators:
    The PADS Layout Link in PADS Logic or creating an ECO file by using Tools > Compare/ECO in PADS Layout will not result in a correct reference designator update; this is particularly true for discrete devices.
    To pass ref des renumbering back to Logic you must specify that an ECO file be created in ECO Options prior to using the Auto-Renumber function in PADS Layout. When you open the ECO toolbar in PADS Layout take note that the "Write ECO file" box is checked, the "Append to file" is unchecked, the "Write ECO file after closing ECO toolbar" is checked and what location the ECO file is being written to. Once the renumbering is complete and you exit from the ECO toolbar the ECO file that was created will then be used in PADS Logic by going to File > Import (change Files of Type to *.eco).
    Logging the ECO file in this manner creates an exact list of the reference designators, recording the current reference designator and the new reference designator that corresponds to it after renumbering.  Note: Make sure that the designs are synchronized prior to performing the auto renumbering procedure.

Posted in PCB | Tagged: , , , | Leave a Comment »

PADS Layout :: How to update all the part decals on the board at once from the library

Posted by Circuit Negma on September 21, 2009


Solution

This will update all parts on the board with information contained in the library.

  1. Open the PADS Layout file you wish to update.
  2. Go to File>Export (you will be exporting an ASCII file).
  3. Select a file name and location to save your ASCII file to, click Save.
  4. The ASCII Output dialog box will appear.
  5. Click on the ‘Select All’ button.
  6. Remove the check mark from Decals and Packages, click OK.
  7. Go to File>New (Save the file if you have made changes, otherwise select No).
  8. If prompted with a ‘Set Start-up File’ dialog box select the System Default Start-up File.
  9. Go to File>Import.
  10. Browse to the location of the ASCII file created in step three, click Open.
  11. The file will read in and update all parts on the board with the information contained in the library.

Make sure that your library contains all the necessary part types and PCB decals for the board.

Note 1: This process will update the PCB decals, but will not update Part type information such as attributes or alphanumeric pins.
Note 2: When a decal’s pad stacks are modified and only the Selected component is updated then the decal name is appended with an "a".  If the design database contains modified decals like this the update process may fail for those decals unless they exist in the library.

Posted in PCB | Tagged: , , , | Leave a Comment »

RJ45 Jack with Magnetic coupling

Posted by Circuit Negma on March 14, 2008


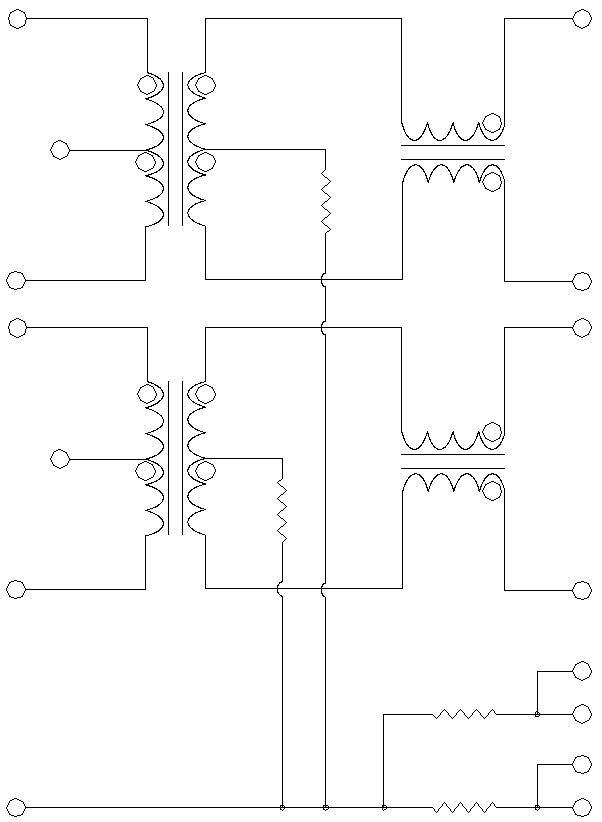
The above picture is the internal schematic representation of part number J0011D21B RJ45 jack from Pulse Inc. @ www.pulseeng.com.

I have came across this component during me design stage of Ethernet controller.

Unfortunately, my schematic software (PADS LOGIC) did not have such a component in its library; so I had to build the above component from scratch.

I used AutoCAD to build the above component and I save it as AutoCAD 12 DXF file.

I followed the following steps to import AutoCAD DXF file into PADS library.

1. Open PADS LAYOUT

2. File > Import > browse to the above DXF file.

3. Once PADS has imported the file, highlight (select everything) the above component.

4. Right click on the selected component > combine

5. Right Click on the selected component > Add to library

6. Give this new shape (component) a name.

7. Close PADS LAYOUT

And you are done.

1. Open PADS LOGIC

2. Tools > Part Editor

3. Click on Edit graphics in the Part Editor Toolbar

4. Click OK to the message

5. Hit the Page Down button a few times to zoom out the screen

6. Click on Add 2D line from Library from in the Symbol editor Toolbar

7. Locate the above drawing and click OK to add it to the screen.

Now, you just have to either add pins or create some kind of shape around the above drawing to create your own custom component.

Note :: To obtain the DXF file, click on the above image and save the file to your harddisk. Then use WinZIP or winrar to extract the DXF file from the image. To do so:

1. open winzip

2. File > open

3. browse to the save image file

OR

1. Open WinZip

2. Drag the image and drop it off inside the WinZip software.

Posted in AutoCad 2006, Electronics | Tagged: , , , , , , , , , | 2 Comments »